
It's time for the MFT Creative Chat. The My Favorite Things Design Team Creative Chat is a monthly feature, where we are challenged to explore our creative spaces and share valuable organizational methods, tools, and shopping strategies with you. You'll be able to peek into our creative spaces, ask questions, and share your own ideas in the MFT forum. This month, we were asked the following questions:
Show us your creative mind at work. Take us on a journey through a card-making session, start to finish.
How do you select colors, layout, embellishments, and overall design?
Share your creative process with us.
Visit Kim's Blog for a full list of designers that have taken up the challenge and get ready to delve into the minds of our creative team.
Sharing my creative process was a fun concept for me. I am a very analytical, mathematical, and methodical stamper. I have a system... LOL
My *basic* card making "recipe" is:
- Decide what "style" of stamp set I will be using (what line, sentiment only or coloring involved, etc)
- Choose a patterned paper pack
- Choose a specific stamp set
- Stamp image and color, when necessary
- Choose layout for card and get layers cut and ready
- Stitch layers with sewing machine
- Choose embellishments and ribbon
- Assemble card
- Add finishing touches
- Decide whether I will finish the inside or not. (Is there another stamp from the set I would like to use? Need to add another sentiment?)
Climb into my world of rules, steps, and procedures as I create this card using Jump for Joy Pure Innocence. :)

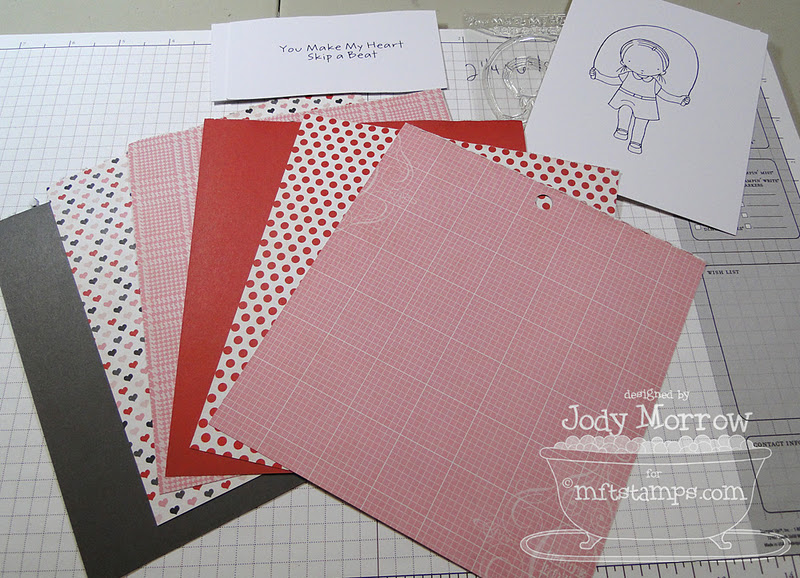
I almost always start with a basic idea of what "line" of stamp sets I want to use. In this case it was Pure Innocence. I had no idea which set I was going to use, but I knew I wanted to start with the patterned paper. It usually ALL starts with the patterned paper. The patterned paper dictates everything else during a card design (in lots of cases), so this is a typical "step 1" for me. I decided I wanted to use the cute Echo Park Yours Truly 6 X 6 patterned paper pad.

After I chose the patterned paper, the stamp set was next on my list. Because the paper was themed, I wanted a lovey dovey stamp set to coordinate with it, so I chose Jump for Joy Pure Innocence. The stamp set includes cute love-themed sentiments, so it fit the "feel" of the paper well.

Let me clear up something about patterned paper... just because they all come in a pack, does NOT mean they all go together. Often times, there are certain patterns that can mix and match, and others that really don't mesh well, so I often pull a handful of patterns that will mix and match well, to start with. These are the patterns I felt had potential. I chose some of the more "light" patterns - meaning they were appropriate for this style of stamp. It's all about making it flow and trying to avoid clashing elements.
My next step is USUALLY to start the card, color the image, etc, but this time I wanted to grab some matching ribbons before I got started so I could decide how to color her, paper-piece her dress, etc. I KNEW I wanted to use ribbon so I needed to see what my options were. I grabbed ribbons from my pink, red, and white drawers.

I hadn't used this paper pack yet, so I needed to color match my Copic markers to the patterned papers in the pack. I hold up the paper to my chart, determine the best color matches, and jot them down on the cover of the patterned paper pad. Next time I want to use the pad, I won't have to color match again, as I have already written them down and can skip that step.


Next, I grabbed some card stock that matched the patterned paper colors. I wanted to have them at my disposal in the event I needed some plain card stock. The bonus of having all this stuff picked out, is that I can create a couple cards after this process, which makes for more efficient stamping. After all the matching is done, you can spend all your time on creativity.

I knew I wanted to paper-piece her dress, so I chose a pattern to use for her dress. I tend to choose SMALL prints for paper-piecing the PIs because you want your pattern to show, and to look realistic (like material would on a real dress). I stamped the image once to color, once on the patterned paper, and another time on white card stock because I knew I wanted to piece her collar and belt on with more white.

I colored her with Copic markers, and cut out the pieces for her dress.

Then, I added my paper-pieced dress.

Next up was the collar and belt.

While I generally don't enjoy pink and red together, that is what the patterned papers called for, so I added small touches of red on her barrette and belt to pull the patterned paper together with the image. I like things to meld and blend nicely.

Next, I choose a general layout and lay it all together to see how it looks. I do this before adding adhesive to anything. It's always easy to switch things out, and I like to have an idea of how the card is coming together before I commit.

I liked how all the pieces and patterns were looking together, so I went ahead and stitched the layers, chose some pink twill from my stash to add a little strip behind the image, and got the card base layer ready. I wanted to add an embellishment (or three) and peeked in my pink, red, white, and gray drawers to see what I could find that would complement the image, and I found these pearly brads. Sweet, simple, and just what the card doctor ordered.

I wanted to jazz up the image, so I grabbed some pink twine, threaded it, and sewed it on so I could lay it over the jumprope on the stamped image.

I used the Best Glue Ever to adhere the twine to the image. Just a little dab'll do it.


Because the card was a little plain, I wanted to jazz up the image a *little* more and opted for some 2 mm Swarovski Hot Fix Crystals for the buckles of her shoes.

I just keep adding things until it looks right to me. This was a clean design, so I called it "good" and this is my finished card:


Thanks for joining me for this month's MFT Design Team Creative Chat. Don't forget to head to the MFT Blog so you can see what the rest of team has in store for you. I'll see you tomorrow for the start of MFT Teaser Time! *YAY*


I love this. Nice to see how a genius brain works. Love your card of course.
ReplyDeleteSo cute Jody - I love the little rhinestones on her shoes! And how fantastic to make a couple of cards at once with the supplies you pull out for the first card - genius! I don't know why I've never done that before.
ReplyDeleteHi Jody! Your card is so cute!! Love the blings on her shoes. Thanks for sharing your process, I think writing down the copics colours on the paper pad is smart. Have a great day!!
ReplyDeleteLooks like we both were on the same wavelength with the set we used for this challenge. Love your card and your creative process!
ReplyDeleteInteresting how much time you put into the card before you ever start making it. So much better than me who finds an image, colors it and then tries to find paper etc to go with it. Love the twine jumprope too
ReplyDeletesoooo sweet, Jody. looove your process and that you always find the little extra touches to make it just perfect!
ReplyDeleteThis is such a great idea! I love your card and thanks for sharing how you made it. I need to work on my process.
ReplyDeleteVery well thought out, I agree it starts with the paper for me too! Loved this post with the whole process - I will be better organized now. The card, as usual, is fabulous! I love the Pure Innocence line.
ReplyDeleteAdorable card, Jody!! Love all the photos of your process! I usually choose my stamp set first, but I think I will switch it up next time and see how that goes :)
ReplyDeleteThis is adorable!!! I love what you said about patterned papers not all coordinating in a pack...it's SO true!!!
ReplyDeleteThanks, Jody. Love your card and your design process. This will help me a lot when I am having a creative lull.
ReplyDeleteHow fun (and informative) to walk through the process with you! Thanks for the step by step with pictures!!
ReplyDeleteOh how wonderful. LOVE that you put the copic colors directly on your paper packs. I also like your systematical approach to each step. And the bling on the shoes is so cute.
ReplyDeleteThanks for sharing... terrific card!
ReplyDeleteJody, I really like to see what you do. thank you for such detailed instructions. it really helps me figure out how to create cards. I am a newbie, so this is important. I love how MFT is heading into the instruction of others to jump in to this wonderful world. thank you so much. ksh
ReplyDeleteYAY!! I'm loving a chance to look inside that brain of yours, LOL! Adorable card!
ReplyDeleteYour little details are always just SO perfect! LOVE how you did the jumprope and the bling on her shoes. LOVE how your ribbon is SO neat too! WOWSA!!
ReplyDeleteOh Jody!! Thanks SO much for all of your great info!! I know this kind of explanation takes a while so thank you thank you for taking the time to share it all with us!
ReplyDeleteCrafty Hugs!
Meredith
so awesome Jody! thanks for sharing your process step by step! such an adorable card too! your matching and details are always spot on- so fun to see how you do it!
ReplyDeleteSO cute! Thanks for sharing your process. :) Her buckles are amazing and the skipping rope addition is the best idea ever.
ReplyDeleteLove it! Very sweet card! Love her twine jump rope.
ReplyDeleteSweet card and I loved seeing how you make your card come together! Loved the tip about writing the co-ordinating copics on the pad = genius!
ReplyDeleteJody, I love your card, but I also love how clearly and directly you explained your process! I felt like I was sitting next to you!
ReplyDeleteThanks for sharing your process. I can see how always using patterned paper as your start is key. I will follow your lead from now on!
ReplyDeleteMarta
Sassyscraps1@yahoo.com
Thanks for sharing your process. I can see how always using patterned paper as your start is key. I will follow your lead from now on!
ReplyDeleteMarta
Sassyscraps1@yahoo.com
Thanks sooo much for sharing your process. I love how cute your card is.
ReplyDeleteJody, I love your designs. Your cards are always so clean and crisp, the the perfect stitching. Thank you for sharing
ReplyDelete