
.0.jpg) Yesterday I found this gift card holder tin at Walmart. I wanted to use it for an accordion album, but needed to chase off Elvis first. :)
Yesterday I found this gift card holder tin at Walmart. I wanted to use it for an accordion album, but needed to chase off Elvis first. :)First, remove the tag and the inserts in the tin.
Grab the lid of the tin with some tongs. (I used my Pampered Chef BBQ tongs since they have a non-metal handle and didn't want to burn myself)
.jpg) I turned on the burner of my gas stove and held the lid over the flame until the paint started peeling. I knew it had been heated enough when the INSIDE of the lid turned brown. This is what it looks like when you are done "flaming" it.
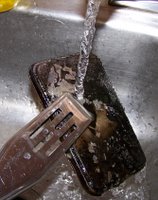
I turned on the burner of my gas stove and held the lid over the flame until the paint started peeling. I knew it had been heated enough when the INSIDE of the lid turned brown. This is what it looks like when you are done "flaming" it.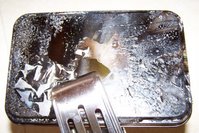 I immediately immersed it in cold running water to cool it off.
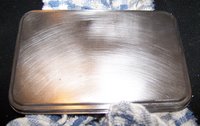
Dry off the tin and then use a Stampin' Up! sanding block to remove the charred remains of Elvis. *chuckling* This is relatively easy if you have it charred enough. This is what the tin lid will look like when you are done sanding. (if you do not have a Stampin' Up! sanding block, you can buy a similar product at the beauty supply store. It is a rectangular, white, fine grit sanding block.)
 You will notice that the inside of your tin lid turned a shade of brown. To remove this I gently sanded. Shown below is the charred lid with a couple swipes of the sanding block.
 .0.jpg) This is the finished inside of the lid
This is the finished inside of the lid.jpg) I also slightly charred the sides of the bottom of the tin and sanded. Below is a pic of the side, already charred and sanded. You'll notice that both my sanding block and hands got quite dirty! LOL
I also slightly charred the sides of the bottom of the tin and sanded. Below is a pic of the side, already charred and sanded. You'll notice that both my sanding block and hands got quite dirty! LOL.jpg) This is the finished product of all my efforts. To finish off the tin prior to embellishing, I sponged some Stazon ink on the lid and sides and then heat set to give a distressed look.
This is the finished product of all my efforts. To finish off the tin prior to embellishing, I sponged some Stazon ink on the lid and sides and then heat set to give a distressed look.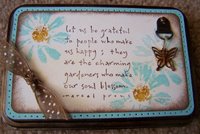


.jpg)
OMG..........that is so cool! Great job on the tutorial!
ReplyDeleteYou morphed Elvis like nobody's business girlfriend!!
ReplyDeleteso cooollllll!! Wish I had a gas stove so I could morph some tins that I have.
ReplyDeleteThe tin turned out beautiful!
OMG! I don't think I could do that to Elvis! LOL! You are way more patient than I am! Finished tin does look awesome!
ReplyDelete