
Here is a quick peek at the project, before we get started, so you'll understand what we are making. :)

First, we need to create the bricks that will line the castle walls. We are creating this from scratch, using only the tools provided in Make The Cut. There is a huge satisfaction in creating something for FREE that you are imagining in your head. It unleashes MUCH creativity. :)
Creating the Castle Wall Bricks
In Make The Cut, click the little gear at the top left of the screen, and then on that drop down menu, click on basic shapes

A box will pop up on your screen that includes various shapes available in Make The Cut to use in creating your own creations. Choose rounded rectangle (double click on it) and it will pop up on your screen. X out of the small box.

Now we have the rounded rectangle on our screen. I want it to be sitting horizontally, but right now, it is vertical. See the arrows on the sides and corners? They are straight and all pointing outward.

Click on the shape again until the arrows change. They should now be curved around the corners. These are the arrows you need to have when you are rotating an image.

To rotate your shape, hold down the Ctrl key on your keyboard, right-click on your mouse (and hold) while grabbing one of the corner arrows and rotate the shape. By holding down the Ctrl key, your shape will rotate the shape in 15 degree increments, to ensure accuracy. You can also rotate "freely" without holding down the Ctrl key. Now, the shape is horizontal.

I sized it to 1.5" X 1". To do this, in the upper bar of your screen, there is a lock icon. Click on it to unlock. Type in the measurements you want in the boxes to the left (width and height) and press enter. The shape will pop to the size you typed in. You can also manually drag the shape to the size you want by dragging out on the STRAIGHT arrows on the shape.

I needed a ton of these for my project. Let's DUPLICATE! :) No need to recreate the wheel each time. Once you get the shape and size you want, all you need to do is duplicate. Right click on the shape, choose duplicate. (If you do not have duplicate as an option, you don't have the shape "selected". Just click on the shape to select it - which means there is a "box" around it, and arrows around it).

You can adjust the number of times to duplicate a shape and the spacing between each one. For this one, I wanted to fill an entire 12 X 12 sheet, so I played around with it until I found the magic numbers: 54 duplicates and .2 inches spacing. You can space them as far apart as you want to. Type in the numbers, and when you are happy, press OK.

Now that the bricks are done, we need to CUT. Be sure your Cricut is connected to your computer, is on, and has the paper loaded. Now, on the computer screen, click on the scissor-in-a-circle icon at the top of the screen. This is the box that will pop up. You can adjust the speed of your cut. Medium worked well for me. Now CUT.

Creating the Castle Window
Now, lets create the castle window. I had googled castles and knew I wanted a rectangle window with a rounded top. If you have an idea in your head of what it will look like, you should be easily able to break it down into "shapes" to create it in Make The Cut.
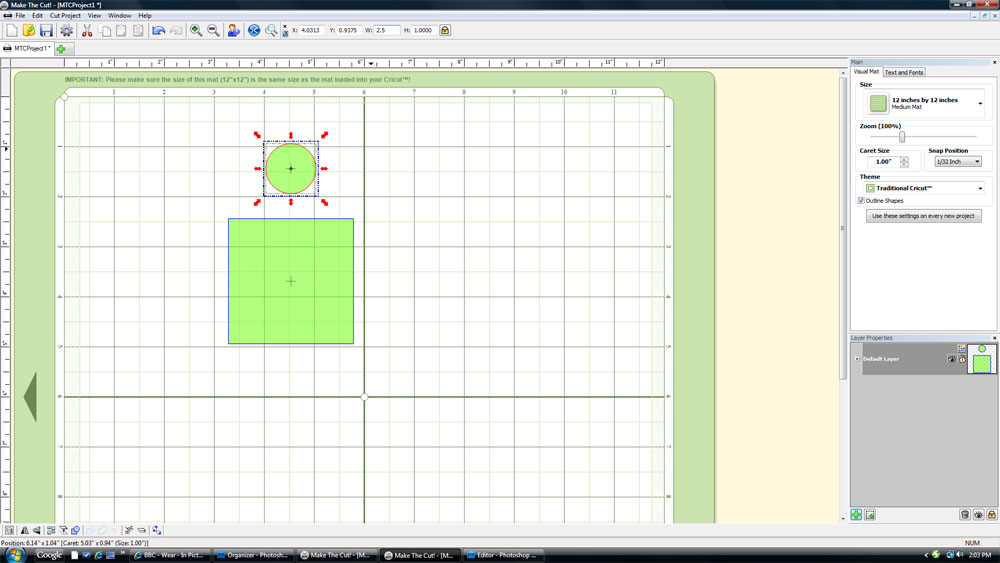
Click on the gear at the top left of the screen, and click on basic shapes. This is the window that will pop up. We need a square and a circle. Double click on the shapes you want to put on your mat (circle and square), and then X out of the basic shapes window.

Click anywhere on the mat, and then click on the square, holding it down and move it away from the circle.

I want my window 2.5" inches wide, so I typed in 2.5 in the width box and pressed enter. If you are making a square and the lock is LOCKED, you can type in just one measurement and it will pop to that size. If you were creating a rectangle, you would UNLOCK it and type in both measurements before pressing enter. Remember, if you make a mistake, just press UNDO (arrow to the left icon) and do it again.
Grab your circle and place it over the square as shown. Make the circle 2.5" by typing in 2.5 and pressing enter. It will pop to 2.5". (shown in picture below this one).
Now, we need to place the circle on top of the square. There is a little + in the middle of each shape. I lined up the horizontal part of + with the top of the square.

Now we need to WELD the shapes together, so that the circle line isn't cutting into the square. To do this, draw a "crop box" around both shapes. Just place your cursor in the upper left corner OUTSIDE of the shape and drag until it surrounds both shapes. (kind of like cropping a picture)
I circled an icon on the lower, left-hand side. This is the WELD function. Welding removes all "cut lines" from the center of shapes and makes them all one piece. Click WELD. Another "path" to do this with is: select your shapes, right click on them, shape magic, weld.

Here is our basic shape of the castle window.

We need to create the "frame" of the window, so we'll need to duplicate the shape we created. Select the shape (click on it), right click, duplicate.

I duplicated it 3 times just to be sure I had enough shapes to work with.

Be sure your LOCK is locked. LOL Now, select one of the shapes (click on it) and type in 3.5" for the width and press enter. We need a bigger shape so we can create the window. Keeping the lock locked, ensures your shape will stay in proportion.

Using the + marks, line up a small and big castle window together. Just line up the + marks and it will be a perfect match.

Select both shapes by drawing a "crop box" around them.

Click on the JOIN icon in the lower tool bar. (or select the shapes, right click, shape magic, join) This "cuts out" the middle, creating our castle window.

Now, CUT.
You now have the bricks and castle window you'll need to create THIS project.
Isn't Make The Cut fun? I feel so... professional! And coming from someone who can barely edit photos, that is saying something. LOL
Remember, Make The Cut is on sale right now for $58.36 (save $21.59). I can definitely say the program is the ONLY reason I wanted a Cricut. I have not bought a single cartridge, and I have had so much with it. :)
Here is one last peek at the project I created using the pieces I created for this tutorial:


FABULOUS Jody!!!
ReplyDeleteyou rock! one day when I get one of those fancy cutting machines, I will so be referencing this. wow! another great project!
ReplyDeleteTotally awesome!!
ReplyDeleteOh.My.Word.
ReplyDeleteI think I may actually be speechless.
Could you possibly be more of a rock star? I think not...
WOW, WOW Jodie! You are good girl!
ReplyDeleteAwesome tutorial, Jody!
ReplyDeleteYou are AMAZING!
ReplyDeleteOh my word! How on earth did I miss THIS? Seriously, BRILLIANT! Gee girl! You ROCK!
ReplyDeleteHoly moly, Jody! That's SOOOOO incredibly cute! You're so VERY creative. :)
ReplyDelete