
Hi all and thank you for stopping by today. As I mentioned above, it is time for this month's MFT DT Creative Challenge and I could not be more excited to show you the project I created. *squeal* We were challenged to create a project with the following theme:
- It's a Wrap
I knew instantly what I wanted to do... I just had to figure out how to execute my idea. I have seen cute little felt or foam fortune cookies previously on the internet, and my plan was to "wrap" them in a Chinese take-out box... luckily I had a Sizzix XL die in my stash (that I don't think I had ever used). Add one super cute Pure Innocence Good Fortune stamp set, and this what you get:

I created the Chinese Take-Out box using my Sizzix die: Box, Takeout (snazzy name huh? LOL). After I had adhered it all together I realized I should have put rivets in, to secure a handle. I used a centering ruler and paper piercer to start the hole, and then gently widened it using my Cutterbee scissors until it was large enough to accommodate the rivets. I set them with my Crop-O-Dile. Two of the flaps were maimed (aka they now have an embossed circle on them) during that process, but they are hidden anyway, so it's ALL GOOD. :)
See how I cut a panel of patterned paper to layer on the box that is the exact same shape? There was a lot of math involved in that process and I'm not sure I can adequately explain in words. If anyone is interested in how to do that, leave a comment and I'll try to make a video about that. :)

I used a piece of canvas fabric I purchased from Walmart to create my Loopy Bloom flower. Once I had assembled it, I rubbed it until it was nice and frayed, gave it a "haircut" to remove any long pieces of canvas, and then admired it for a while. I just LOVE the way it looks in canvas!

I used some "rope trim" I had purchased from Stampin' Up some time ago for the handle. I'll be sad when I run out of that stuff.

Ok, it's time to coo! You ARE cooing, right? Check out these adorable felt fortune cookies. I had seen this done and couldn't resist giving it a try, myself.

Want to learn how? I made a VIDEO that you can see by clicking HERE, or clicking the "play" button in the embedded video below.
I like the fortune/greeting to slightly stick out of one end.

4 fortune cookies fit in my Take-Out Box.

I made this card to accompany my Chinese Take-Out box using the ADORABLE Pure Innocence Good Fortune stamp set. Isn't her kimono adorable? LOVE it!

I made another crazy canvas Loopy Bloom for the card.

I stamped her on Stampin' Up Naturals Ivory card stock and colored her with Copic markers. Her Kimono is paper-pieced with some fitting patterned paper and then I layered over her "sash" that I colored on an addition piece of card stock.
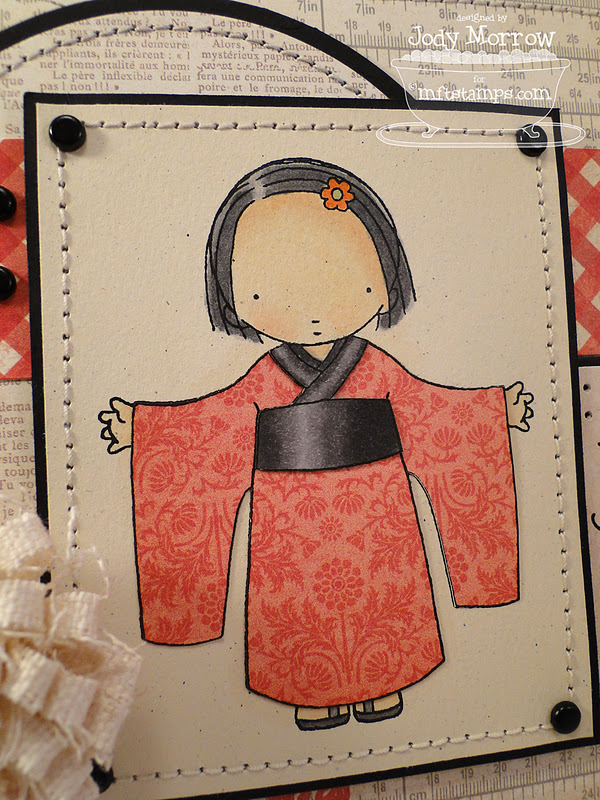

I stamped one of the sentiments included in the stamp set on the Mini File Tab Die-namics and then layered it in black using a trick that Joanne Basile posted HERE.


Although I shot a video showing how to make the felt fortune cookies, I want to be able to accommodate you no matter what your learning preference is, so here is the tutorial in photo format. :) (Do I get bonus points for that?)
First, I stamped 4 "fortunes" and one extra to decorate my Take-Out box with. I cut apart many of the sentiments so I could change them up and create enough to fill all 4 fortune cookies. That's the beauty of clear stamps!

Cut out 4 felt circles. Mine are sized 3 3/4" and I'm not sure it would work if the circle was much smaller. I prefer a wool-blend felt. If you use the cheap felt from Michaels it feels rough and doesn't cut very cleanly. Your fortunes need to be about the same width as the circle.

I held everything together with my handy dandy Surebonder Detail Glue Gun. You need one.
Lay your sentiment slightly below the midline of your circle.

Add some hot glue as shown here:

Fold over like this:

Grab the ends of the circle and fold in the opposite direction of where you just adhered the circle together.

Add some hot glue between the two sides that are touching here:

The fortune was sticking out too much for my liking at the "end" of the fortune:

So, I added a little more hot glue and sealed up that edge a little more.

Tada! LOVE these little things. And what's better, is that they come together in just a minute or two. You could make a TON of these (class treats?) in a short amount of time.

Here are my four fortune cookies and the decorated Take-Out box. *swoon* I just LOVE the way this all came together and it was NOT hard! :) YAY

I LOVE the Loopy Bloom and when it's paired with canvas, I SUPER love it. :)

Mini Tabs... gotta love em! Stick a sentiment ANYWHERE!


I hope you enjoyed this month's Creative Challenge! Be sure to check in next month for the next installment. We love stretching our creativity and hope you're inspired to try one of the projects you've seen today. :) Don't forget to head over to the MFT Blog to see what the rest of the team came up with. :)
See you soon!
XOXO


Oh my goodness gracious gravy! This is freakin, crazy amazing. I love all of it. I made these fortune cookies a while back with paper - so fun - but how smart to make them with felt. Gorgeous!
ReplyDeleteI bow to your greatness........
ReplyDeleteI'd coo but the cat would think I was nuts. ;) At least there's no sewing involved for me. hehe
ReplyDeleteAs if the box and card aren't cute enough...I was totally cooing over the cookies!!!!! You're to cool for school!!!
ReplyDeletehmmm I am getting hungry for chinese food now LOL ... love love love your take out box and card Jody. I have to hunt down some of that canvas material those loopy bloom flowers are gorgeous
ReplyDeleteYou freakin CRACK ME UP!!!! :) :) :) I made these fortune cookies for a Asian swap... LMAO I got the idea from this gal that reminds me of you... greenbean crafterole her blog...
ReplyDeleteThis is an AWESOME gift holder but TOTALLY NOT last minute! LMAO It would take me HOURS to complete!!! BUT YES... I said, COOOoooooo!!!!! hahahahhaha
What a great idea!! Thanks so much for the tutorial...love those fortune cookies...this will be a great project for the Chinese New Year...
ReplyDeleteOMGosh! Jody this is out-of-this-world GORGEOUS! I am speechless!!!! I LOVE it all but the fortune cookies are absolutely adorable...LOVE,LOVE,LOVE them! Love your stunning card too...PI Good Fortune is so precious!!! Such a beautiful and creative gift set!!!!
ReplyDeleteHugs,t
Amazing project!! Love it!
ReplyDeleteOh this is fun, Jody! Best packaging I've seen yet! Love the fortune cookie idea....that's cute!
ReplyDeleteI can't get over your fortune cookies! They look so real, and probably taste just as good too, teehee. Thx for the how-to. - jennifer
ReplyDeleteCooing??? HELL YES I'm cooing!!!! This is AMAZING Jody!! And that canvas loopy bloom?!?! Seriously!?!! You are a genius!!! A crafty genius....
ReplyDeleteI'm in awe...
Crafty hugs friend!!
Meredith
Who wouldn't LOVE to be gifted with such a fun little box??!! Amazing! Thanks for the video!
ReplyDeletewhow...did I say WHOW....this is amazing...love the felt cookies and that material for the loopy bloom ...perfection!
ReplyDeleteGorgeous creation - so clever and perfectly executed :). LOVE it!!! I actually prefer photos, so am so happy when you include them :). Oh,and those canvas flowers are stunning!
ReplyDeleteThis is so over the top CUTE, Jody!! It simply couldn't be better with that little PI, and your video and tutorial are amazing!!!
ReplyDeleteGenius.
ReplyDeleteOK...good thing I have a dentist appointment tonight because my toothache just got worse looking at all this SWEETNESS! You are AMAZING in every possible way...and I must echo Jackie's comment above...I bow to your greatness...
ReplyDeleteOh, and OMG @ that canvas flower. OMG OMG OMG.
ReplyDeleteamazing! that loopey bloom is sooooo cool!
ReplyDeleteOh Jody, your take out box and the card are AWESOME!! I love what you made and those fortune cookies are fantastic!! I want to give you a BIG hug for such great ideas!! Love the loopy bloom - it looks great with the frayed bits of the canvas. Outstanding projects, LOVE them!! {big hugs}
ReplyDeleteI already said it once and I am going to say it again, I totally LOVE these projects Jody. How cool that you've made fortune cookies from felt!!!
ReplyDeleteAnd that beautiful canvas flower... *sigh*
O. M. G. This project is freakin' brilliant. There are just no words. I'm speechless!
ReplyDeleteAmazing project, Jody! I don't know what I love more - the canvas loopy bloom or the felt fortune cookies. Wonderful!
ReplyDeleteAmazing project and tutorial!
ReplyDeleteThose fortune cookies are crazy cool!
ReplyDeleteYour entire Chinese theme project is amazing. Love the take out box and the fortune cookies. Great job and creativity.
ReplyDeleteOkay, you are BRILLIANT! Every thing about this is AMAZING!
ReplyDeletetotally sweet! LOVE LOVE this set! thanks for great photos & the video!
ReplyDeleteHOLY COW!! This is just to cute for words. I hope this is going to someone who truly adores you (like me). I was cooing at the box...but wait - THERE'S MORE!! The cookies are to die for. OMG
ReplyDeleteSuper cute! Love the fortune cookies!
ReplyDelete