
Wood pallet art is quite trendy right now and I wanted to use the new More Washi Patterns to recreate that look. The sketch I used was found in a Papercrafts sketch book and it fit the stamps and dies perfectly.
I used the woodgrain washi pattern stamp and stamped it on separate strips. When assembling the strips, I alternated the patterns so that it didn't look as "cookie cutter".
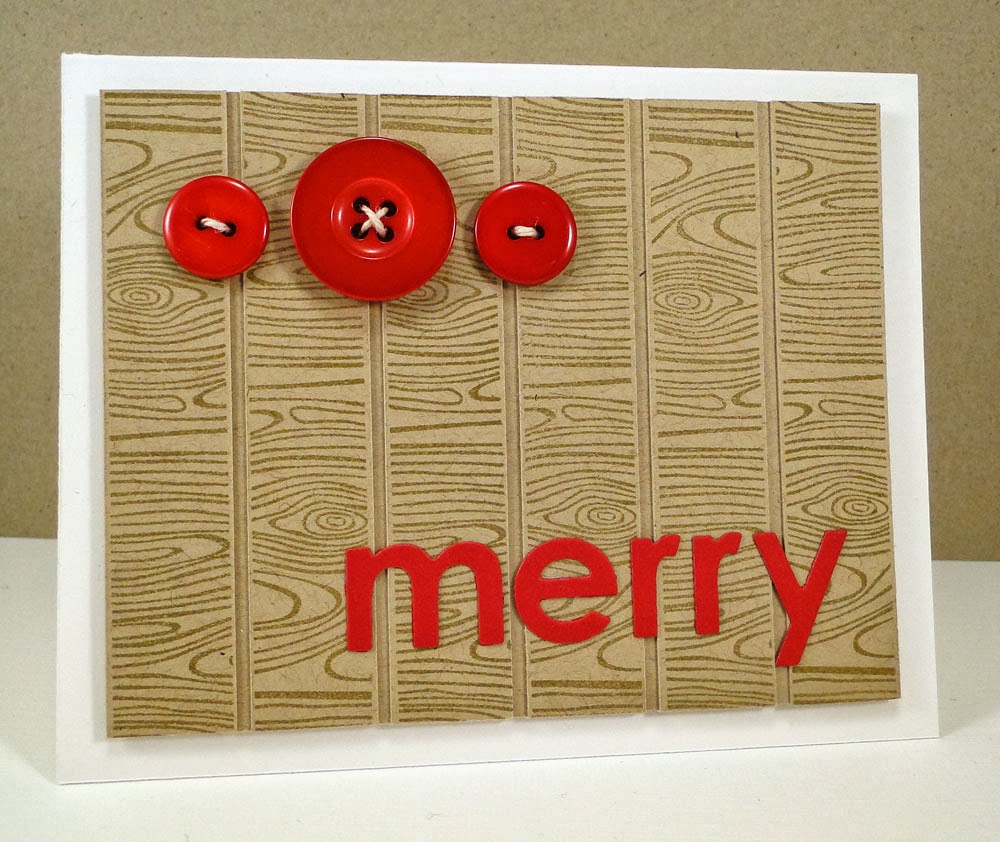
I cut the "merry" out using Christmas Greetings Die-namics and adhered it down using a COOL technique I discovered when trying to align the word evenly and perfectly. Keep scrolling for a quick photo tutorial. :)

I stitched on three Wild Cherry button with Hemp Cord.

Here is a quick and easy way to perfectly place your die-cut letters or words found in dies like Christmas Greetings, Happy Hellos, Happy Birthday, or Thank You.
1.) die-cut the word of choice (in this case the print "merry") and remove the letters.

2.) Put a strip of removable tape over the front side of the negative of the die-cut.

3.) Flip it upside down and insert the letters back in the negative portion, adhering them to the removable tape.

4.) This is what your card stock will look like at this point.

5.) On the back-side of your die-cut letters, add adhesive of choice. I used a mix of 1/8" Scor Tape and Best Glue Ever.

6.) Remove the liners so that all adhesive is exposed.

7.) Stick it down on your card or layer as desired. This is your one and only shot to get it right so be sure you have it placed just where you want it. Then, remove the removable tape from the top of the letters.

8.) Remove the remaining "negative" piece of card stock to reveal your perfectly spaced and placed letters.


These products and many more will be available for purchase on October 8 at 10 PM EST. Be sure to check out the MFT Blog to see what the rest of the team has come up with today.


Brilliant!!! Never would have thought if that!
ReplyDeleteBrilliant!!! Never would have thought if that!
ReplyDeleteLove the woodgrain. Great CAS card!!
ReplyDeleteCool, creative design. Like the wood grain strips and big buttons. THX for the tip on letter placement. Great idea! :)
ReplyDeleteThanks for the tutorial! That's very helpful, sweet CAS card!
ReplyDeleteWow what a lovely card. I used a similar technique to place the the cut outs in the spider web die namics. I added liquid glass to each cut out piece while it was still in the originally cut piece then placed it down on a piece of card stock and peeled the spider web off leaving a reversed negative of the web. I used that piece to create a card face. It worked so well even I was shocked.
ReplyDeleteThanks for the great tips.I can see a use for this new washi tape set of stamps being endless.
ReplyDeleteSimple yet awesome!!! Love this Jody!!
ReplyDeleteWhat smart little trick there with the removable tape!
ReplyDeleteVery cute and simple!-Jen Naus
ReplyDeleteWhat a great idea,thanks.
ReplyDeleteAmazing with the wood stamp! and thank you for this tip! its very handy :)
ReplyDeleteGF, this is fab! I love the wood grain with it!
ReplyDeletesweet card and thanks for the tutorial. always love that you take the time to show us your secrets!
ReplyDeleteAmazing card and thank you so much for sharing that great tip!!!!
ReplyDeleteI am so glad you showed this tutorial...plan to use it to get things lined up perfectly!
ReplyDeleteJody, that helpful hint is worth a million bucks! I can use it on everything -- except maybe glittered thickers, but who cares about those anyways? OMG you are a genius! Thank you so much! And I love this card, the whole idea! I've probably mentioned this to you and the other DT members a gazillion times but my son (now 27) travels in a rarified circle of international croquet players, almost all of whom are significantly older than he, many of whom have wives who graciously send him Christmas cards -- what's a 27 year old kid to do? This is perfect for a nagging mother to give as a gift for the holidays and perfectly appropriate (read not to mushy) for him to send. THANK YOU!!!
ReplyDeleteVery cool card, and an awesome idea!!
ReplyDeleteWhat a great card, love the kraft/wood look.
ReplyDeleteWhat a great trick! Thanks for the tip! Love that wood grain washi stamp!
ReplyDeleteThank you for sharing this great tip!
ReplyDeleteWhat a brilliant idea! Thank you for sharing it and for sharing your card. I adore your use of the washi pattern and the clean color scheme.
ReplyDeleteThanks for sharing that tip. This is certainly a great way to adhere letter or sentiment dies. Love your card and that woodgrain washi tape look.
ReplyDeleteThanks for the great tip
ReplyDeletelovely card, thanks for the tip!
ReplyDeleteLove the bold and simple look. Thanks for the great tip!
ReplyDeleteBeautiful card! I love the woodgrain background.
ReplyDeleteAwesome graphic design, Jody!
ReplyDeleteGreat card! Thanks for the tip on the easy placement of the die cut words.
ReplyDelete