
With the new Woven Basket and adorable "Peep" filler option, the fun multiplies! (cue laughter)

I created 7 cute peeps and adhered them between the Woven Basket and Trapezoid Treat Box leaving plenty of room inside to fill with yummy treats!

The basket was cut in Kraft and painted with Distress Paint Crackle Paint in Picket Fence.

I lined the bottom of it with Fresh Cut Grass and a peep that has gone rogue. The sentiment is from One of My Favorite Peeps and was stamped on the Sentiment Strip.

Up next is the adorable Pure Innocence stamp set, One of My Favorite Peeps. I wanted to keep this one fresh and clean, so I resisted the urge to pile on a ton of stuff. LOL She is colored with Copic markers and her dress is paper-pieced. I stamped her on another piece of card stock, stamped Spring Backgrounds chevrons on her dress, and then cut it out. No patterned paper on this creation! :) The Sour Apple card stock was stamped with a stamp from Hearts and Stitches. The tiny "Peep" word was stamped on a piece from Accent It - Flags and Tags. The grass was drawn in with Prismacolor pencils.

I added some "knees" to her with Copic markers.

Her black hair was colored with C1, 3, 5, 7, and 9.

Here is a peek inside.

Here are some tips (and a mini tutorial) for you!
After painting the basket, ink it with Antique Linen Distress Ink to give it an antique finish.

Add some grass, or the border of your choice to the base to jazz it up.

Create realistic peeps!
Brayer Lemon Drop ink on Sweet Tooth card stock peep die-cuts from the Woven Basket Die-namics.


Insert the colored die-cut back into the peep die.

Flip it over. Note the carefully placed "poke holes".

Use those as your guide. Take a fine-tipped marker (here is the one I used) and dot inside the poke holes with the marker.

Voila! Peeps with perfectly placed facial details. Now replicate them (like bunnies). *insert laughter reel here*

To draw out the embossed detail of the bow, brayer Pink Lemonade ink over bow die-cuts from the Woven Basket Die-namics.


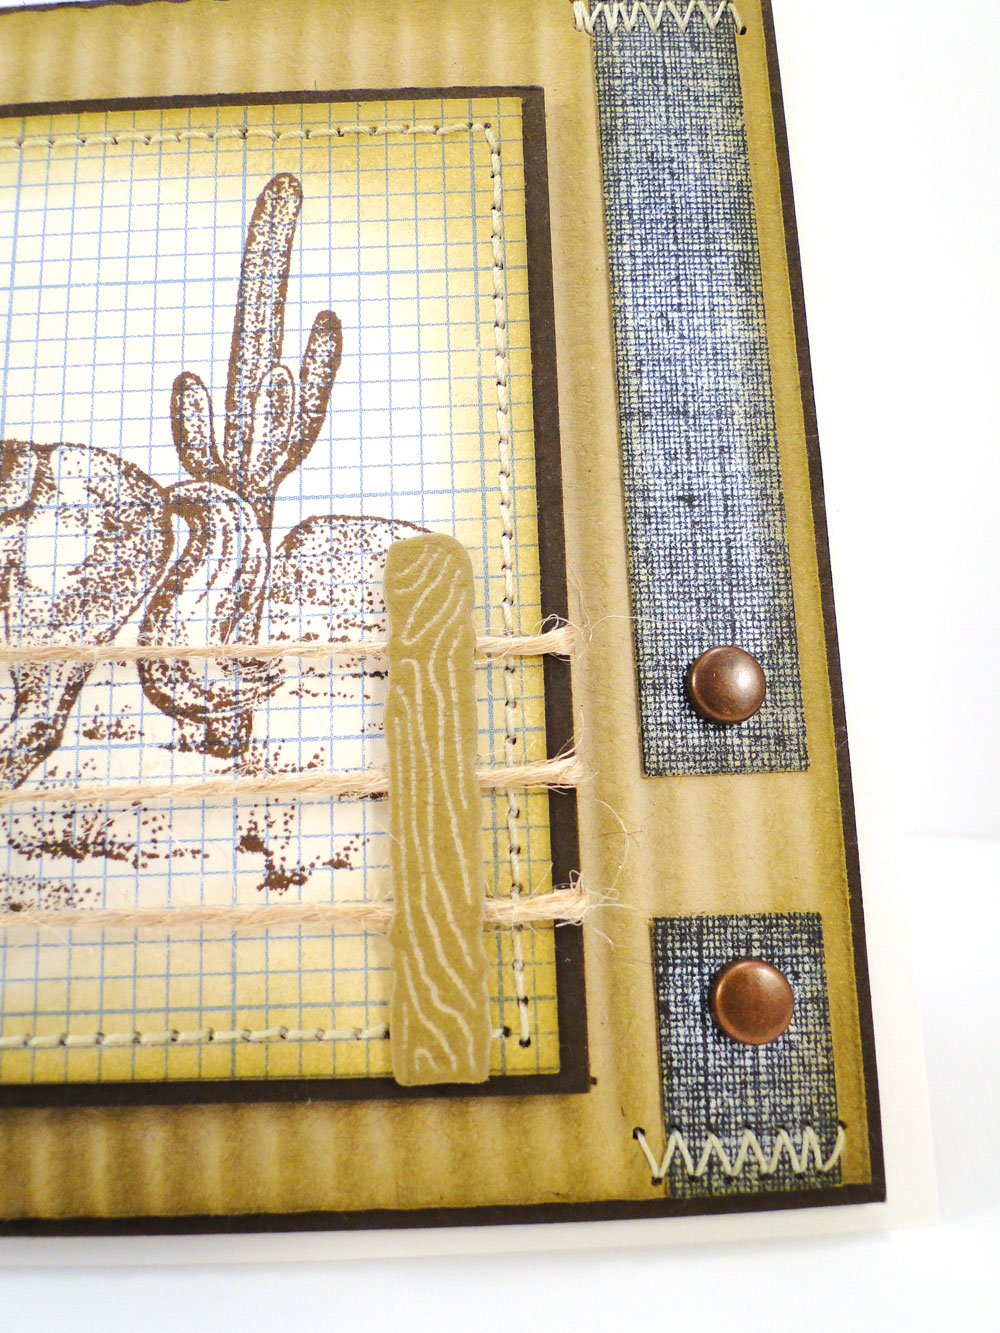
Next up, I got rustic with the amazing Inspired by the Wild Wild West stamp set.

Howdy was stamped on a piece from Howdy Frames. The image is stamped on some patterned paper.

The Barbed Wire Fence Die-namics was used, but I opted for some twine instead of the barbs. This is a horse pen. :) I did the "brayer to draw out the embossed detail trick".

TIP: Sponge with Kraft Premium Dye Ink. It's PERFECT! *swoon*
Here is a peek inside.


I thoroughly distressed and dirtied the majority of the components on this card.

I sponged all over with Kraft Premium Dye Ink.

Here is a peek inside!

Here is a mini tutorial to show you how to replicate the denim paper I used. Wet the paper with a spray bottle until you can easily crumple it into a ball like this:

Lay it out flat.

Dry with a heat gun. It will be kinda crisp, which is JUST RIGHT. :)

Sponge over the "peaks" and the edges of the paper with Kraft Premium Dye Ink.


Now mat it and stitch it on. Messy is OK!

Finally, sand the surface lightly to add one more layer of rustic goodness.

If you've hung in with me this far, THANK YOU. I know it was hard work. :)
Ready to see what the rest of the team has come up for this month's MFT New Product Tour? Head on over to the MFT Blog for a complete list of participating designers!

And don't forget all the Brand Spankin' New products are available NOW, right HERE. (you can also click the banner below)


Absolutely adorable and gorgeous projects - the details are just amazing. xx
ReplyDeleteFantastic post! The replicating peeps are adorable and the faux jeans are amazing!
ReplyDeleteLOL, these are GREAT!!!!
ReplyDeleteJody Your basket and card are so sweet. I LOVE the western cards, really fabulous :)
ReplyDeleteGreat projects. Love your basket full of peeps. The western cards are fabulous. Can't wait for my goodies to arrive.
ReplyDeleteOh my gosh, I love your western cards so much and I so appreciate you including the tips on making the peeps and basket. Awesome detail.
ReplyDeleteSo many things - your peeps are gorgeous; the cowboys are wonderful and the tutorial for the denim is great!
ReplyDeleteWow, love them all, but the basket of peeps has to my fav! So cute.
ReplyDeleteOh WOW! Love your cards and thank you so much for the tutorials!!!
ReplyDeleteBeautiful basket of bright peeps! Great cards, your Western themed cards are fantastic, thank you for sharing.
ReplyDeleteWow, love the tutorials, your western cowboy is awesome
ReplyDeleteWOWZA Jody! What an amazing post jam packed with INCREDIBLE projects! I love the distressed basket and all those peeps! Your little PI girl with the knees is darling! I'll have to give that a try! Thanks for the inspiration and for sharing all those wonderful techniques, tips and tricks :)
ReplyDeleteWhile I really love your basket and card, I adore the Howdy card. The way you stamped the horse and rider makes it look like a vintage photo. Love the tutorial for making your denim paper look dirty! Great job!
ReplyDeleteSuch fun projects! Thank you for the tutorials, you shared such fun info. I love the bunnies lined up in the basket, and the layered grass.
ReplyDeleteI love the Peeps so much!
ReplyDeleteMy jaw dropped at all those peeps! So cute! Love all the tips, too. Fabulous!
ReplyDeleteGorgeous projects! The faux denim panel is a wonderful, wonderful touch! I love it! And that whole card just screams "marlboro man"...(not the cigarettes--ugh--but the rugged manly man type..) Love it!
ReplyDeleteEverything is beautiful but that basket of peeps is AWESOME! So cute, now I have to have that die! My wallet is going to take a hit!
ReplyDeleteFantastic!!! Now this is the Jody I love to see creating a page full of goodness!!! Thanks for sharing your tutorials. Looking forward to ordering soon!
ReplyDeleteLOVE the Feeling Lucky card! Thanks for the tutorial!
ReplyDeleteGorgeous projects! I love all the peeps in the basket and your technique for the worn out denim look is great! I love how your western cards turned out!
ReplyDeleteLovin' these projects ... the basket is FAB and really love the denim look you created. Enjoy following your blog!
ReplyDeleteWow...jaw dropping gorgeous creations!
ReplyDeleteHoly smokes! These are amazing pieces of art, Jody! Thanks for sharing your process with us as a tutorial! I am in love with it ALL! Super job!
ReplyDeleteCheryl First
aka Cafexpressions
wow!!! this post is amazing! love all the details you shared with us. that basket technique is a fantastic look. Going to try that! and your denim....you had me fooled. I thought it was real fabric at first. great work, Jody!
ReplyDeleteGreat post!
ReplyDeleteWOW ...amazing projects, fab tutorials..love your creativity Jody..thanks for sharing!!!
ReplyDeleteAwesome projects! I love each and every one! Thank you for showing how you created them. Have a fantastic day!
ReplyDeletefantastic projects! love how you created the look of real denim with paper... so cool!!
ReplyDeleteThat little basket of bunnies is soooo cute! Great set of Western themed cards too.
ReplyDeleteI love all these but i'm soooo in love with the western cards ( they are kind of my passion). I can't wait to get my hands on some of these new goodies
ReplyDeleteGorgeous cards!! And great tutorials Jody.
ReplyDeleteSuch a cute card. Love those little Peeps. That distressing you did with the paper on the other card came out Fantastic! Bravo!
ReplyDeleteSuch a creative card! By far my favorite! Love the peeps!
ReplyDeletelove the basket of peeps to go with your peeps card so cute.
ReplyDeletethanks for the "how-to"s and LOVE the PEEPs diecut!
ReplyDeleteThanks por tutorial, and I love your basket
ReplyDeleteWow! Gorgeous projects :) Thanks for the tutorials!
ReplyDeleteAck! That peep basket is too cute for words!
ReplyDeleteOMG I totally love the basket with the cute yellow bunnies!!! Awesome. Also love your other goodies and mini tutorial.
ReplyDeleteI am curious what brayered means. Can't find the translation on the internet.
Thanks for sharing all these wonderful cards in the past few days, such great inspiration and fun.
It's never hard work to hang in to the end. I think it's more hard work to get all the photos taken loaded and written about!
ReplyDeleteLOVE your basket of peeps and the twine you used for the fence
ReplyDeletefatastic tutorials. Love the western cards so much! Thanks for the chance to win!
ReplyDeleteThat "peeps" basket is super adorable!!!
ReplyDeleteThanks for the tutorial!! This is super cool! I LOVE your PEEPS basket!!!
ReplyDeleteAwesome post and thanks for the tutorial! Your peeps are just darling!
ReplyDeleteFabulous great another fun month
ReplyDeleteWhat great projects! Love the little peeps and the way you used twine with the fence Die-Namic. Great little details that really create a great finished project!
ReplyDeletethese are amazing! Thanks for more awesome tutorials too! Love these!! now i "need" to shop again :)
ReplyDeleteAbsolutely amazing projects, with great detail! And the peeps look so real! Yum!
ReplyDeleteThanks for such gorgeous projects. I love that I learnt a new technique with the brayering colour onto die cuts. Something new to experiment with.
ReplyDeleteGirl you seriously made that denim paper SING! LOVE the wonderfully realistic details and the step by step how to. HOLLA!!! :)
ReplyDeleteIncredible projects & wonderful tutorials! Thank you!
ReplyDeletegreat tip with the brayering. thanks
ReplyDeleteSo much awesomeness!!! We'd love for you to try out at our new design team: Sister Act Card Challenge
ReplyDeleteAMAZING projects Jody! I am really blown away by your talent...
ReplyDelete~ Meredith